

I just bought a used engine in need of rebuild so i will be doing this very soon , ill photo the rebuild on the way .
Other engine rebuild posts of interest
Yamaha YZF R125 water pump removal inspection refitting
Yamaha YZF R125 How to remove the Flywheel stator generator alternator
Yamaha YZF R125 top end barrel cylinder piston removal
Yamaha YZF R125 clutch removal - inspection - replacement
Yamaha YZF R125 clutch rebuild
Yamaha YZF R125 Gear selector shaft lever replacement removal
Yamaha YZF R125 engine strip , cases split , gearbox , engine repairs
Yamaha YZF R125 clutch rebuild strip inspection test and measure
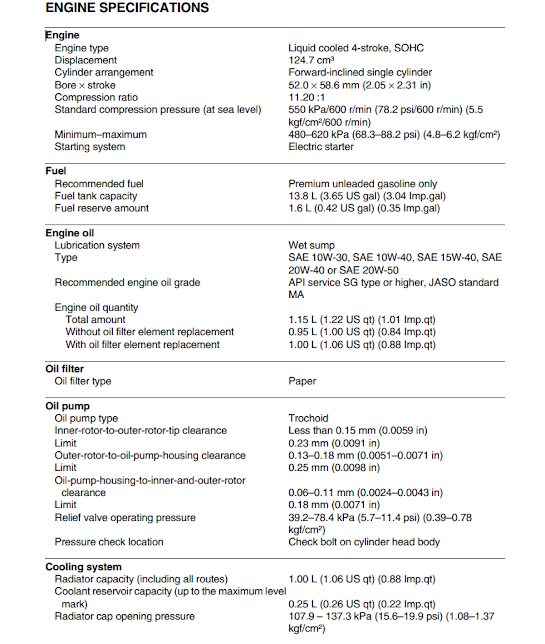
Whether you are fixing a seized bottom end or upgrading to a high-compression top end, rebuilding the Minarelli-derived R125 engine is a rewarding but precise task.
1. The Generational Shift: Standard vs. VVA
Gen 1 & 2 (2008–2018): These use the classic SOHC 4-valve head. Parts are plentiful and the timing is straightforward.
Gen 3 & 4 (2019–2026): These feature VVA technology. The cylinder head is more complex, featuring a solenoid-actuated high-lift cam lobe. Warning: You cannot swap heads between VVA and non-VVA models without changing the ECU and wiring harness.
2. Critical Inspection Points
The Oil Pump: The R125 lacks an oil pressure light. If your engine seized, the oil pump is likely scored. Always replace it during a rebuild to prevent a repeat failure.
Crankshaft Play: Check the "big end" for vertical play. If you feel any movement, the crank must be pressed apart or replaced.
VVA Solenoid (2019+): Inspect the electrical connector for corrosion. A sticking solenoid will cause the bike to "bog" at 6,600 RPM.
3. Updated Torque Specifications (2026 Data)
| Component | Torque (Nm) | Notes |
| Cylinder Head Bolts | 22 Nm | Use a "criss-cross" pattern |
| Cylinder Base Nuts | 10 Nm | Do not overtighten; gaskets will crush |
| Camshaft Sprocket Bolt | 30 Nm | Use a holding tool; don't rely on the chain |
| Clutch Spring Bolts | 10 Nm | (Gen 3/4 feature Assist & Slipper clutch) |
| Crankcase Bolts | 10 Nm | Work from the center outward |
4. Timing the VVA Engine (Gen 3 & 4)
Timing the 2019+ models requires extra care. Ensure the "I" mark on the flywheel aligns with the pointer while the cam sprocket mark is flush with the cylinder head surface.
Note: The VVA mechanism must be in its "deactivated" (low-lift) state during assembly to ensure the valve clearances are set correctly.
5. Parts Sourcing & Kits
OEM Kits: Recommended for daily commuters to ensure Euro 5+ longevity.
Big Bore Options: 150cc and 180cc kits (like Malossi or Athena) are popular but require a fueling module (like a Power Commander or a remapped ECU) to prevent running lean and melting the new piston.
Gaskets: Never reuse a head gasket. For 2021+ Euro 5 models, ensure your gasket set includes the updated exhaust manifold seals.
Essential Technical Links
Workshop Service Manuals – Essential for the full 2019+ wiring and VVA schematics.Troubleshooting the Fuel Injector – Do this before your first start-up after a rebuild.
Safety Warning: Engine rebuilding involves handling heavy components and hazardous fluids. Always use a calibrated torque wrench. Wear full protective gear when test-riding your rebuilt machine to ensure everything is operating safely.


See video of this process below
No comments:
Post a Comment